Wednesday, February 4, 2015
New blog at sgwhitehat.com
I am starting a new cyber security blog at sgwhitehat.com. I would probably not be spending much time on this blog anymore. Cheers!

Sunday, April 6, 2014
AWS DynamoDB API calls not working? Could be the region is wrong
I was playing with Amazon Web Services recently, and one cool NoSQL database SAS (Software as a Service) they have is DynamoDB. As a ruby guy, I naturally used the AWS Ruby SDK to access it. Took me a while to figure out that I had to create a user in my account AND then add DynamoDB access permissions to the user before I can make DynamoDB API calls (AWS takes their security seriously, not bad ...).
I created a table and populated it with data via the browser, and I made API calls to it. But I kept getting
AWS::DynamoDB::Errors::ResourceNotFoundException: Requested resource not found
Huh? The table is right there in the browser but the API call cannot find it! Turns out that the response is correct - the table does exist, but in a different AWS datacenter (or region). Just had to add the :region option.
dynamo_db = AWS::DynamoDB.new(:access_key_id => 'xxxx',:secret_access_key => 'xxxx',:region => 'your-region')
The exact region string can be (hopefully) inferred from the table details in the browser. An example is 'us-west-1'
I suspect the same pitfall may apply to other AWS services that are tied to regions.
I created a table and populated it with data via the browser, and I made API calls to it. But I kept getting
AWS::DynamoDB::Errors::ResourceNotFoundException: Requested resource not found
Huh? The table is right there in the browser but the API call cannot find it! Turns out that the response is correct - the table does exist, but in a different AWS datacenter (or region). Just had to add the :region option.
dynamo_db = AWS::DynamoDB.new(:access_key_id => 'xxxx',:secret_access_key => 'xxxx',:region => 'your-region')
The exact region string can be (hopefully) inferred from the table details in the browser. An example is 'us-west-1'
I suspect the same pitfall may apply to other AWS services that are tied to regions.
Sunday, January 20, 2013
Copying iPhoto Library too slow? Here is a trick.
Found to my surprise that my mac needs 24 hours to copy a 45 GB iPhoto Library to the USB hard disk. Why? Because the iPhoto Library itself is a package of tens of thousands of files. It doesn't help that iPhoto itself generates thousands of files on its own.
The trick is that it takes far shorter time if you copy 45 GB as a single file into the USB media (because you avoid tens of thousands slower filesystem calls / writes onto the USB media).
Try this method to reduce the copying to a "mere" few hours:
1) Tar up the iPhoto Library. Prefer tar to compression as your JPEG and MOV are already highly compressed, so doing compression would be a waste.
Open up the Terminal in Mac OS. Use "tar -cf your_name.tar your_original_iPhoto_Library".
This took a long enough time for my iPhoto Library, maybe 1 hour.
2) Copy the your_name.tar into the USB. As one big binary blob, the copying is much faster. Takes about 20 mins in my case.
3) At the destination mac, just untar it in a directory of your choosing.
Open up the Terminal. Use "tar -xf your_name.tar". This took less than 1 hour.
The trick is that it takes far shorter time if you copy 45 GB as a single file into the USB media (because you avoid tens of thousands slower filesystem calls / writes onto the USB media).
Try this method to reduce the copying to a "mere" few hours:
1) Tar up the iPhoto Library. Prefer tar to compression as your JPEG and MOV are already highly compressed, so doing compression would be a waste.
Open up the Terminal in Mac OS. Use "tar -cf your_name.tar your_original_iPhoto_Library".
This took a long enough time for my iPhoto Library, maybe 1 hour.
2) Copy the your_name.tar into the USB. As one big binary blob, the copying is much faster. Takes about 20 mins in my case.
3) At the destination mac, just untar it in a directory of your choosing.
Open up the Terminal. Use "tar -xf your_name.tar". This took less than 1 hour.
Sunday, June 6, 2010
SWIG Ruby constants
This is my further adventures in the use of SWIG for Ruby 1.9
I defined constants in interface.i for SWIG
#define constant1 10
#define constant1 20
and I got the ruby module created. However how do I use the constants? Turns out that SWIG creates the constants in a funny (though still usable) way. Assuming you call your module 'm', you can see the relevant methods in irb by executing M.methods. The most important ones are
M.constants <= returns an array of the constants
M.const_get(symbol) <= returns actual value
For example
irb>M.const_get :constant1
10
There is another method M.const_set(symbol,x) which is useful if you are extending the module with more constants. If you just call
irb> M.const_set :constant1 2
this returns an error, as :constant1 is probably declared final (or its equivalent).
Tuesday, May 25, 2010
DLL wrapper for Ruby 1.9 in Windows
I found myself in a situation where I had to access a Windows DLL to control some external PC peripheral. Hey I thought, this is a good opportunity to hone my Ruby skills.
At first I used Ruby's Win32API. It works fine, provided that the dll function does not return a pointer. For example, if the DLL function is
char * controlx (int a, int b, some_struct * c)In ruby you can process arguments a, b, and even c, but I almost vomited blood trying to process the return pointer. The thing is, Ruby do not use pointers ! This makes it very tricky to process return pointers from functions.
I was about to use plain old C to do the job, or maybe even Python (I got a Python friend - or fiend - who is telling me that this is no prob in Python, even though Python doesn't use pointers too). Then I googled upon the SWIG project (www.swig.org).
It do me a while to get SWIG working for Ruby. SWIG is pretty well documented, but the below gives the juice of the process and some gotchas. SWIG essentially generates a Ruby wrapper module (in c) for the DLL.
To save hassles, get the same c compiler and environment that created the Ruby windows version you are using. Ruby 1.9 uses MINGW compiler (basically an open source Windows C compiler that uses the Windows libraries, unlike CYGWIN that uses the POSIX libraries). You also need the make program. So I installed MINGW and MSYS, which gives a POSIX-like shell with the essential make program and other usual shell goodies. I think it may be possible to use Microsoft Visual C and nmake.exe (same Windows library calls right?), but I didn't to bother to try that.
You have to create a interface.i file that lists down the DLL functions. It looks like this.
%module your_desired_ruby_name%{ /* Put header files here or struct declarations that are needed by the functions below */ %}
%feature("autodoc", "1"); /* this is for Ruby's rdoc */extern char * DLL_function1(void);
%feature("autodoc", "1");extern bool DLL_function2(void);...............
Then just execute
> swig -ruby interface.i or for c++
> swig -c++ -ruby interface.i SWIG is supposed to be able to wrap both C and C++ functions for Ruby. However when I tried it with the c++ option, the generated c++ wrapper code is not compilable. No problem, I just changed all the bool types in my interface to char, and I had switched to a nice C interface. Anyway why would anyone export C++ functions in a DLL? DLLs are meant to be called from any language.
SWIG generates a c program named interface_wrapper.c. This is just a Ruby c module. So you can now use the standard Ruby ways to compile the module. You can either go the gcc way, or use Ruby built-in mkmf class. mkmf is recommended because it handles all the gcc settings for your Ruby installation (mostly the include dirs etc).
To use mkmf, create a extconf.rb file that looks like this
require 'mkmf'$libs = append_library($libs, "your_dll_name")create_makefile('your_ruby_module_name')Now execute
>ruby extconf.rbThis creates a Makefile in the local directory
>makeThis compiles the wrapper Ruby module. Put the DLL in the same directory as the wrapper c code to avoid any linking problems. Then just
>make installViola! Your Ruby wrapper module had been compiled and copied to your Ruby installation. In my case it is
C:\Ruby19\lib\ruby\site_ruby\1.9.1\i386-msvcrt To use your DLL functions, just fire up irb or type in a ruby program
irb> require 'your_module_name'irb> YOUR_MODULE_NAME_IN_CAPITAL.dll_function_xxxxOh yeah one last thing. Use rdoc to generate some nice documentation of what the DLL input/output parameters are.
rdoc -f html interface_wrap.c Sunday, November 23, 2008
Removing Nokia E71's camera
Many companies do not allow their employees to use camera phones. Unfortunately my company was one of them. But the nokia E71 is such a great phone - I like the full QWERTY keyboard very much, SMS will no longer a chore like my old phones - that I decided to get one and just remove the camera myself.
One needs the T5 and T6 special screwdrivers, and some sharp plastic edge to dissassemble the E71. No metal tools for prying open some of the parts! I learnt too late from a forum that this is VERY unwise and will just damage your cover (which it did a little to mine)

1. First remove the back covers and battery and SIM card.

2. Use T5 or T6 tool to unscrew (RED)
3. Just depress the latches (BLUE) to push out the front cover
4. As there are metal latches at the head of the phone, you got to clear the latches a bit from the body first, then just slide it towards the head (maintain the angle shown in the next pic). Make sure that the latches do not hit the flexible PCB strip that goes to the volume controls. I was trying to slide the cover out so hard that I didn't notice until quite late that the latches were damaging flex PCB. Luckily the volume controls are still working in the end (I think).

You will get this:

There are two more screws at the upper left and right of the LCD that you need to unscrew using T5 or T6 before you can remove the back cover.
By the way, I am not sure if you need to take out the antenna cover at the base of the device in order to remove the front cover, but I did anyway.
5. Pry the PCB assembly off the back cover. Camera is highlighted in RED.

6. The 3.2 Megapixel camera is attached to the underside of the PCB by a simple flex connector, so its easy to remove. You do have to open up the two pieces of the PCB assembly a bit to remove the connector
See how slim the thing is :

Split to access the camera connector:

The camera, with the mechanical auto focus:

7. If you look closely, there is a pin hole camera (RED) at the head of the phone for 3G video calls. You can either desolder this or just seal it up with opaque tape or something.

8. Now assemble back. This is probably the most DIFFICULT part. You need to snap the PCB assembly into the cover, and you got to do it carefully so that you don't irrevocably damage some plastic. I find it easier to disassemble the PCB assembly. Put in the green piece first into the back cover then the LCD piece. When you put the front cover back, do remember to slide in the front cover from the top a bit.
Ta ta! Assembled back. The cool sticker at the back is from a recent Japan trip.

Just for curiosity, I disassembled everything in the process to see how the E71 is constructed. Surprisingly, most of the PCB is bare. Most of the electronics is at the lower half, shielded behind EMI enclosures.

You can see three antennas. The bigger one is for WCDMA (or 3G). The two smaller white ceramic-like antennas are for Bluetooth and WiFi. I believe the design is called folded dipole?

The back cover is carefully designed too. You can see a speaker, vibrator (the rectangular metal box - I know there's a magnet inside because it attracts the screws), the camera flash (PCB). The parallel strips thingy is the headset jack. No idea whats the circular object though.

One needs the T5 and T6 special screwdrivers, and some sharp plastic edge to dissassemble the E71. No metal tools for prying open some of the parts! I learnt too late from a forum that this is VERY unwise and will just damage your cover (which it did a little to mine)

1. First remove the back covers and battery and SIM card.

2. Use T5 or T6 tool to unscrew (RED)
3. Just depress the latches (BLUE) to push out the front cover
4. As there are metal latches at the head of the phone, you got to clear the latches a bit from the body first, then just slide it towards the head (maintain the angle shown in the next pic). Make sure that the latches do not hit the flexible PCB strip that goes to the volume controls. I was trying to slide the cover out so hard that I didn't notice until quite late that the latches were damaging flex PCB. Luckily the volume controls are still working in the end (I think).

You will get this:

There are two more screws at the upper left and right of the LCD that you need to unscrew using T5 or T6 before you can remove the back cover.
By the way, I am not sure if you need to take out the antenna cover at the base of the device in order to remove the front cover, but I did anyway.
5. Pry the PCB assembly off the back cover. Camera is highlighted in RED.

6. The 3.2 Megapixel camera is attached to the underside of the PCB by a simple flex connector, so its easy to remove. You do have to open up the two pieces of the PCB assembly a bit to remove the connector
See how slim the thing is :

Split to access the camera connector:

The camera, with the mechanical auto focus:

7. If you look closely, there is a pin hole camera (RED) at the head of the phone for 3G video calls. You can either desolder this or just seal it up with opaque tape or something.

8. Now assemble back. This is probably the most DIFFICULT part. You need to snap the PCB assembly into the cover, and you got to do it carefully so that you don't irrevocably damage some plastic. I find it easier to disassemble the PCB assembly. Put in the green piece first into the back cover then the LCD piece. When you put the front cover back, do remember to slide in the front cover from the top a bit.
Ta ta! Assembled back. The cool sticker at the back is from a recent Japan trip.

Just for curiosity, I disassembled everything in the process to see how the E71 is constructed. Surprisingly, most of the PCB is bare. Most of the electronics is at the lower half, shielded behind EMI enclosures.

You can see three antennas. The bigger one is for WCDMA (or 3G). The two smaller white ceramic-like antennas are for Bluetooth and WiFi. I believe the design is called folded dipole?

The back cover is carefully designed too. You can see a speaker, vibrator (the rectangular metal box - I know there's a magnet inside because it attracts the screws), the camera flash (PCB). The parallel strips thingy is the headset jack. No idea whats the circular object though.

Saturday, July 26, 2008
Internet Radio Device
I decided to use the pico-ITX computer mainly as an internet radio device. Ok, so this would be an under-utilization of the 1 GHz CPU, 512 MB, Win XP appliance, but I can't think of any other more interesting applications that I would need at the moment. Of course I can use it to watch streaming video, or play my mp3 collections, but internet radio (SHOUTCAST) would be its main purpose.
I googled and installed the following software
- Winamp : mp3, internet radio player
- CLamp : command line control application to Winamp's API
- AutoHotkey : a key mapping tool with surprisingly powerful scripting capabilties.
I also got myself a nice little numeric keyboard. With a simple script, I am now able to select radio stations, control volume, and shutdown the device with a single keypress. I have also configured XP so that it will autoplay the first internet radio station upon boot up. No user input required. On the power switch, wait 30s, you got the music. The audio-out goes straight to my hi-fi system auxilary input, so the sound is great.

The device doesn't need a monitor to boot up, but I linked the VGA out to my HDTV. I usually off the HDTV when I turned on the device, but if I wanted to find out the name of a particularly good song, I can check it out on screen.

I googled and installed the following software
- Winamp : mp3, internet radio player
- CLamp : command line control application to Winamp's API
- AutoHotkey : a key mapping tool with surprisingly powerful scripting capabilties.
I also got myself a nice little numeric keyboard. With a simple script, I am now able to select radio stations, control volume, and shutdown the device with a single keypress. I have also configured XP so that it will autoplay the first internet radio station upon boot up. No user input required. On the power switch, wait 30s, you got the music. The audio-out goes straight to my hi-fi system auxilary input, so the sound is great.

The device doesn't need a monitor to boot up, but I linked the VGA out to my HDTV. I usually off the HDTV when I turned on the device, but if I wanted to find out the name of a particularly good song, I can check it out on screen.

Small-Form Factor PC and Win CE
When I got the VIA Artigo, it comes bundled with full (but non-commerical) versions of Windows CE 6.0 and Visual Studio 2005. I guess its part of Microsoft's marketing to get more people hooked on their embedded OS.
I tried playing with Windows CE 6.0 R2. Its a bit irritating at first because I had to install a couple of service packs before Win CE 6.0 R2 can be installed. But once I got Windows CE running, I am impressed (I am normally not a fan of Microsoft). Win CE is good for quickly building embedded applications. With the Platform Builder in Visual Studio, one can click and add components such as web servers, drivers, OS applications from a fairly comprehensive library into an image. This image (a bit like vmlinuz) is compiled and downloaded into the target embedded device. Downloading and debugging is done via ethernet, so its very convenient (once you managed to install and run eboot.bin onto the target so that it can initiate the ethernet connection)
Provided that a Win CE board support package (BSP) is available from the embedded platform vendor, embedded linux development should eat the dust compared to Windows CE where it comes to time-to-market. A BSP contains the customised driver code needed to interface with the platform devices and peripherals.

Unfortunately, fast doesnt mean no work. Tinkering is still needed to make CE work on the Artigo. Artigo just refuses to recognize my USB thumbdrives. Since I was not really keen to spend many hours doing embedded development/debugging at this particular moment, I decided to just use good old XP instead. Actually I was deciding between XP and Linux, but because of the application that was forming in my mind, I chose XP. Linux is stable and fast, but when it comes to multimedia and graphics, Windows is still better, in my opinion.
I tried playing with Windows CE 6.0 R2. Its a bit irritating at first because I had to install a couple of service packs before Win CE 6.0 R2 can be installed. But once I got Windows CE running, I am impressed (I am normally not a fan of Microsoft). Win CE is good for quickly building embedded applications. With the Platform Builder in Visual Studio, one can click and add components such as web servers, drivers, OS applications from a fairly comprehensive library into an image. This image (a bit like vmlinuz) is compiled and downloaded into the target embedded device. Downloading and debugging is done via ethernet, so its very convenient (once you managed to install and run eboot.bin onto the target so that it can initiate the ethernet connection)
Provided that a Win CE board support package (BSP) is available from the embedded platform vendor, embedded linux development should eat the dust compared to Windows CE where it comes to time-to-market. A BSP contains the customised driver code needed to interface with the platform devices and peripherals.

Unfortunately, fast doesnt mean no work. Tinkering is still needed to make CE work on the Artigo. Artigo just refuses to recognize my USB thumbdrives. Since I was not really keen to spend many hours doing embedded development/debugging at this particular moment, I decided to just use good old XP instead. Actually I was deciding between XP and Linux, but because of the application that was forming in my mind, I chose XP. Linux is stable and fast, but when it comes to multimedia and graphics, Windows is still better, in my opinion.
Friday, July 25, 2008
Small-Form PC
I was lucky enough to get my hands on a VIA Artigo computer recently. It is probably one of the smallest small-form PC ever. Sleek and small.

The VIA Artigo uses the pico-ITX motherboard, which is the smallest motherboard from VIA. The pico-ITX board is primarily designed for embedded applications that need more-than-the-usual horsepower. For example, industrial control, set-top boxes such as singtel's mio TV, car computers, ATMs, even thin clients.
VIA sells the Artigo computer as a hobbyist kit, without RAM or hard disk. My Artigo has the following.
- CPU : VIA C7 (This is a 1 GHz x86 CPU. It also apparently has built-in AES/SHA cryptographic cores!)
- Chipset: VIA VX700 (northbridge, southbridge, integrated graphics, HD audio all in one package). Supports SATA, IDE, USB, DDR2 RAM etc
- RAM: 512 MB
- 3.5" HD: 80 GB
- 4 USB ports
- 1 VGA port
- audio out and in ports
The VX700 chipset diagram

Lets see whats inside

The heat sink is for the C7 CPU and the VX700. I like the low profile heat disspation design.
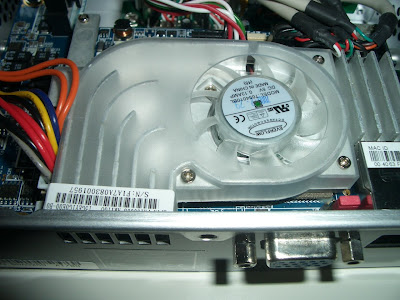
Harddisk is mounted to the custom chasis mounting.

Removing the hard disk reveals the notebook RAM


The VIA Artigo uses the pico-ITX motherboard, which is the smallest motherboard from VIA. The pico-ITX board is primarily designed for embedded applications that need more-than-the-usual horsepower. For example, industrial control, set-top boxes such as singtel's mio TV, car computers, ATMs, even thin clients.
VIA sells the Artigo computer as a hobbyist kit, without RAM or hard disk. My Artigo has the following.
- CPU : VIA C7 (This is a 1 GHz x86 CPU. It also apparently has built-in AES/SHA cryptographic cores!)
- Chipset: VIA VX700 (northbridge, southbridge, integrated graphics, HD audio all in one package). Supports SATA, IDE, USB, DDR2 RAM etc
- RAM: 512 MB
- 3.5" HD: 80 GB
- 4 USB ports
- 1 VGA port
- audio out and in ports
The VX700 chipset diagram

Lets see whats inside

The heat sink is for the C7 CPU and the VX700. I like the low profile heat disspation design.

Harddisk is mounted to the custom chasis mounting.

Removing the hard disk reveals the notebook RAM

Monday, July 14, 2008
Gaming Rig More Pics
I decided to upload some day pics of the rig as well.


I placed the RF transceiver for the mouse and keyboard inside the case, and held it down to the DVD bay with some tape.

The joints of the transparent case are made of acrylic too.


I placed the RF transceiver for the mouse and keyboard inside the case, and held it down to the DVD bay with some tape.

The joints of the transparent case are made of acrylic too.

Gaming Rig Components Pics
EN9600GT graphics card with the 'gladiator' quiet fan

The red butterfly is the BTF90 fanless CPU cooler!

You can see the copper heat sink fins here. Note the height of the cooler. There are also four heat pipes. A casing fan and the power supply fan are just next to the cooler to ensure a good air flow.

And this must be the northbridge heat sink ....

And the smaller southbridge heat sink.

Back IO port panel

And the 625W Enermax Mod82+ power supply. Its pretty quiet and the modular connectors, while not essential, make the case a lot tidier. The casing fans turn out to be the main noise generator here.


The red butterfly is the BTF90 fanless CPU cooler!

You can see the copper heat sink fins here. Note the height of the cooler. There are also four heat pipes. A casing fan and the power supply fan are just next to the cooler to ensure a good air flow.

And this must be the northbridge heat sink ....

And the smaller southbridge heat sink.

Back IO port panel

And the 625W Enermax Mod82+ power supply. Its pretty quiet and the modular connectors, while not essential, make the case a lot tidier. The casing fans turn out to be the main noise generator here.

Gaming Rig Pics
These flashy LED fans give the rig a warm fuzzy glow ....


The first game I tested the rig on is Command & Conquer : Tiberium Wars. Playing at 1920x1080 widescreen ... real nice!


The first game I tested the rig on is Command & Conquer : Tiberium Wars. Playing at 1920x1080 widescreen ... real nice!


Tuesday, July 1, 2008
9600GT overclocking
Okay the next step is to overclock the GPU (Graphics Processing Unit). An overclocked GPU speeds up gameplay a lot than an overclocked CPU. It turns out to be pretty easy and safe to overclock the GPU. One merely adjusts the clock frequencies (core, shader, memory) via software and there is no risk of over-voltage damage. The only risk is that higher frequencies may result in too high a temperature and cause thermal damage. From the nVidia forums, people claimed that the 9600GT can work safely even up to 80 'C, and the typical load is around 50 - 60 'C.
I tuned the settings using nVidia's control panel, and tested the stability of different values using 3DMark06. I tried Rivatuner for tuning, but it doesn't yet officially support the latest nVidia driver, and anyway the vendor's own software is good enough.
The default frequencies are ...
core : 650 MHz
shader : 1625 MHz
memory (DDR) : 900 MHz
3DMark06 score : 10702
I found out that the shader frequency in the 9600GT is apparently linked to the core frequency by a ratio of 2.5, ie, an increase of 10 MHz in core = 25 MHz in shader, for the 9600GT to be stable.
After a few tries, the best stable frequencies I can get is
core : 775 MHz
shader : 1938 MHz
memory : 975 MHz
3Dmark06 score : 12068
Running C&C3 for some time (at the best graphics settings), I get a highest GPU temperature of around 52 'C, so the temperature is well within limits. I had tweaked the core clock to increase by 19%, and the benchmark reports an increase in performance of around 13%. Excellent! Comparing my 3Dmark06 score with so-called VirtualMark scores (simulated for other configurations that are not overclocked),
mine | 8800GT | other 9600GT | 9800GX2
12068 | 11600 | 10500 | 13600
Now the 9600GT GPU is a mainstream card. nVidia named their cards as x400, x600 or x800, where x400 is for low-end, x600 for mainstream games and x800 is for the best gaming performance. The nVidia 9000 series is a newer architecture compared to the previous the 8000 series generation. Now the 9600GT is supposed to perform a bit worst than the 8800GT normally, but after overclocking its on par! And now my OCed GPU performs not too badly against the 9800GX2 (2 GPU cores), which is the best currently, and cost like 4 times as much. He he ....
I tuned the settings using nVidia's control panel, and tested the stability of different values using 3DMark06. I tried Rivatuner for tuning, but it doesn't yet officially support the latest nVidia driver, and anyway the vendor's own software is good enough.
The default frequencies are ...
core : 650 MHz
shader : 1625 MHz
memory (DDR) : 900 MHz
3DMark06 score : 10702
I found out that the shader frequency in the 9600GT is apparently linked to the core frequency by a ratio of 2.5, ie, an increase of 10 MHz in core = 25 MHz in shader, for the 9600GT to be stable.
After a few tries, the best stable frequencies I can get is
core : 775 MHz
shader : 1938 MHz
memory : 975 MHz
3Dmark06 score : 12068
Running C&C3 for some time (at the best graphics settings), I get a highest GPU temperature of around 52 'C, so the temperature is well within limits. I had tweaked the core clock to increase by 19%, and the benchmark reports an increase in performance of around 13%. Excellent! Comparing my 3Dmark06 score with so-called VirtualMark scores (simulated for other configurations that are not overclocked),
mine | 8800GT | other 9600GT | 9800GX2
12068 | 11600 | 10500 | 13600
Now the 9600GT GPU is a mainstream card. nVidia named their cards as x400, x600 or x800, where x400 is for low-end, x600 for mainstream games and x800 is for the best gaming performance. The nVidia 9000 series is a newer architecture compared to the previous the 8000 series generation. Now the 9600GT is supposed to perform a bit worst than the 8800GT normally, but after overclocking its on par! And now my OCed GPU performs not too badly against the 9800GX2 (2 GPU cores), which is the best currently, and cost like 4 times as much. He he ....
Sunday, June 29, 2008
CPU Overclocking
The Gigabyte EP45-DS3R motherboard is pretty friendly for overclocking. With a little browsing of Intel's P45 chipset and E8000 series CPU datasheets, I am ready to void my CPU's warranty.
From BIOS, I am able to change the clock frequency that the P45 MCH (Memory Controller Host or something) provides to the CPU. This determines the CPU core frequency, with the use of the CPU multiplier. The E8400 CPU has a locked multiplier of x6 or x9 (x6 is used automatically by software through the Enhance SpeedStep feature to reduce power consumption).
The initial CPU clock is 333 MHz. With a x9 multiplier, the usual CPU core frequency is 2997 MHz. By adjusting the clock to 378 MHz, I can get 9 x 378 = 3402 MHz core frequency or a 13% increase from the stock 2997 MHz. This also implies a FSB of 4 x 378 = 1512 MT/s, (x4 is due to DDR2 or intel's data quad-pumping) when the E8400 stock FSB is only 1333 MT/s. Excellent!
There is a tradeoff however. The memory cannot run with a faster FSB. My HyperX Kingston DRAM is rated at 1066 MT/s FSB. Attempts to make the memory run faster than this cause the BIOS bootup or POST (Power On Self Test) to fail. The EP45-DS3R is smart enough to reset the BIOS to default values when this happens, so this makes experimenting convenient.
Typically, a memory multiplier is employed to reduce the memory clock frequency that the MCH provides to the DRAM, so that the memory's FSB can be lowered. Here comes the crux : this multiplier is fixed at certain ratios only (why won't Intel use an arbritary counter and divider?). This basically means that at a CPU clock frequency of 377 MHz, the best memory multiplier I can get is 2.66. This means the DRAM FSB is 2.66 x 378 = 1005 MT/s. A theoretical decrease in memory bandwidth of around 6%. More of the actual memory performance later.
While the EP45-DS3R BIOs allows the CPU clock to be increased without limit, the real-life limit is heat dissipation. A high core frequency increases heat dissipation (power dissipation is proportional to frequency x voltage^2). An inappropriate core frequency will literally melt your CPU. The E8400 CPU thermal specification is approximately 72 'C, but its best to do some derating and operate at a lower temperature if you like your CPU to have longevity. Having no idea whats the proper derating value, I settle on 60 'C. The E8400 has a thermal sensor which reports the CPU temperature (or strictly the temperature at the geometric center, which is supposed to be the hottest anyway). I can access this temperature using the motherboard vendor's software EasyTune.
I used Prime 95 to push the CPU to the limit and measure the temperature at different overclock settings. Prime 95 is designed to discover prime numbers, but it is also good as a stress / stability test software for overclocking.
Its time to see how well my FANLESS cpu cooler handles the heat. To be fair, the casing fans and the heat flow inside the case is also very important, especially for a FANLESS cpu cooler.
3 GHz (default) --- 50 'C
3.4 GHz --- 52 'C
3.6 GHz --- 60 'C
I chose 3.4 GHz in the end. I can probably used 3.5 GHz or something, but I wanted a healthy margin. As dust starts to accumulate on my sparkling new CPU cooler and casing fans, I expect the heat removal efficiency to reduce, and the temperature to rise. Especially since I dont think I want to clean the PC so often, I rather live with a better margin. Another less compelling reason is that Prime 95 stresses only 1 core out of E8400 dual core capabilities. With dual core in use at the same work level (which is unlikely to happen in typical applications by the way -- nothing pushes the core like Prime 95 does), I would shutter at the kind of heat if 3.6 GHz is used.
The rather large 8 'C difference between 3 and 3.6 GHz suggests that there is some kind of performance envelope below which the BTF-92 cooler is able to do its job well.
Using PC Wizard's CPU benchmark, this is the results of overclocking
3 GHZ (default) --- 150K
3.4 GHz --- 192K
3.6 GHz --- 218K
So 3.4 GHz is pretty good. There is in fact a 30% improvement according to the benchmark.
The memory bandwidth at 1008 MT/s FSB does suffer a bit with 3.4 GHz core frequency. At the rated 1066 MT/s, PC Wizard measured a bandwith of 5.9 GB/s (a lower number from the Kingston marketed 8.5 GB/s! grumble grumble :P ) Forced to use 1008 MT/s, the bandwidth is now 5.4 GB/s, a decrease of around 9%. But since the CPU L2 cache is an enormous 6 MB, I would expect the effect of the decrease in bandwidth to be greatly reduced.
From BIOS, I am able to change the clock frequency that the P45 MCH (Memory Controller Host or something) provides to the CPU. This determines the CPU core frequency, with the use of the CPU multiplier. The E8400 CPU has a locked multiplier of x6 or x9 (x6 is used automatically by software through the Enhance SpeedStep feature to reduce power consumption).
The initial CPU clock is 333 MHz. With a x9 multiplier, the usual CPU core frequency is 2997 MHz. By adjusting the clock to 378 MHz, I can get 9 x 378 = 3402 MHz core frequency or a 13% increase from the stock 2997 MHz. This also implies a FSB of 4 x 378 = 1512 MT/s, (x4 is due to DDR2 or intel's data quad-pumping) when the E8400 stock FSB is only 1333 MT/s. Excellent!
There is a tradeoff however. The memory cannot run with a faster FSB. My HyperX Kingston DRAM is rated at 1066 MT/s FSB. Attempts to make the memory run faster than this cause the BIOS bootup or POST (Power On Self Test) to fail. The EP45-DS3R is smart enough to reset the BIOS to default values when this happens, so this makes experimenting convenient.
Typically, a memory multiplier is employed to reduce the memory clock frequency that the MCH provides to the DRAM, so that the memory's FSB can be lowered. Here comes the crux : this multiplier is fixed at certain ratios only (why won't Intel use an arbritary counter and divider?). This basically means that at a CPU clock frequency of 377 MHz, the best memory multiplier I can get is 2.66. This means the DRAM FSB is 2.66 x 378 = 1005 MT/s. A theoretical decrease in memory bandwidth of around 6%. More of the actual memory performance later.
While the EP45-DS3R BIOs allows the CPU clock to be increased without limit, the real-life limit is heat dissipation. A high core frequency increases heat dissipation (power dissipation is proportional to frequency x voltage^2). An inappropriate core frequency will literally melt your CPU. The E8400 CPU thermal specification is approximately 72 'C, but its best to do some derating and operate at a lower temperature if you like your CPU to have longevity. Having no idea whats the proper derating value, I settle on 60 'C. The E8400 has a thermal sensor which reports the CPU temperature (or strictly the temperature at the geometric center, which is supposed to be the hottest anyway). I can access this temperature using the motherboard vendor's software EasyTune.
I used Prime 95 to push the CPU to the limit and measure the temperature at different overclock settings. Prime 95 is designed to discover prime numbers, but it is also good as a stress / stability test software for overclocking.
Its time to see how well my FANLESS cpu cooler handles the heat. To be fair, the casing fans and the heat flow inside the case is also very important, especially for a FANLESS cpu cooler.
3 GHz (default) --- 50 'C
3.4 GHz --- 52 'C
3.6 GHz --- 60 'C
I chose 3.4 GHz in the end. I can probably used 3.5 GHz or something, but I wanted a healthy margin. As dust starts to accumulate on my sparkling new CPU cooler and casing fans, I expect the heat removal efficiency to reduce, and the temperature to rise. Especially since I dont think I want to clean the PC so often, I rather live with a better margin. Another less compelling reason is that Prime 95 stresses only 1 core out of E8400 dual core capabilities. With dual core in use at the same work level (which is unlikely to happen in typical applications by the way -- nothing pushes the core like Prime 95 does), I would shutter at the kind of heat if 3.6 GHz is used.
The rather large 8 'C difference between 3 and 3.6 GHz suggests that there is some kind of performance envelope below which the BTF-92 cooler is able to do its job well.
Using PC Wizard's CPU benchmark, this is the results of overclocking
3 GHZ (default) --- 150K
3.4 GHz --- 192K
3.6 GHz --- 218K
So 3.4 GHz is pretty good. There is in fact a 30% improvement according to the benchmark.
The memory bandwidth at 1008 MT/s FSB does suffer a bit with 3.4 GHz core frequency. At the rated 1066 MT/s, PC Wizard measured a bandwith of 5.9 GB/s (a lower number from the Kingston marketed 8.5 GB/s! grumble grumble :P ) Forced to use 1008 MT/s, the bandwidth is now 5.4 GB/s, a decrease of around 9%. But since the CPU L2 cache is an enormous 6 MB, I would expect the effect of the decrease in bandwidth to be greatly reduced.
Friday, June 20, 2008
Gaming Rig 2
Turns out that the stock E8400 CPU heat sink/fan is crappy. It uses push pins that are next to impossible to install. I can see my motherboard bending unnaturally when I tried to install them. Have read some online comments that its doable, and that the GA motherboard PCB can take a lot of bending, but I find it hard to believe that you wont damage the motherboard this way. I decided to make another trip to Sim Lim to acquire the cool looking CPU cooler ZeroTherm BTF90 for $76. By the way, its fanless ... yes fanless. Absolute silent cooler. The shop salesman claim that its good for overclocking too, but I have to try that out. The BTF90 uses a back plate and screws, so none of that push pins risk.
Got myself a HDMI cable too, and a pair of Zalman ultra-quiet LED fans too. Turns out later that the Zalman fans need 4 pin rectangle connectors (probably intended to be used as CPU fan?), which my power supply dont have, so some jury rig is needed :P
Total costs to date: 1380 + 78 + 40 + 2x18 = $1534
Got myself a HDMI cable too, and a pair of Zalman ultra-quiet LED fans too. Turns out later that the Zalman fans need 4 pin rectangle connectors (probably intended to be used as CPU fan?), which my power supply dont have, so some jury rig is needed :P
Total costs to date: 1380 + 78 + 40 + 2x18 = $1534
Wednesday, June 18, 2008
Gaming Rig
I had finally decided to assemble a gaming PC rig. After doing some research over the weekend, and wanting to keep my budget under S$1500, I went down to Sim Lim Square. I got myself the following sweet components :
Motherboard: Gigabyte GA-EP45-DS3R
Intel P45 chipset has the 16 lanes of PCI-e 2.0, which is good for future graphics card upgrade. It's the latest mainstream chipset. Can support 1066 MHz DDR2 RAM, and up to 1600 MT/s FSB. Going to try overclocking on this in the future.
CPU: Intel E8400
45nm, 65W TDP, 3 GHz clock, FSB clock 333 MHz, FSB 1333 MT/s, most importantly 6 MB L2 cache, so you dont need a super duper fast dual-channel RAM.
Graphics: Asus EN9600GT, 512 MB
A standard nVidia 9600 chipset with core speed of 650 MHz. All the frills one need, ie, HDMI, DVI, VGA, S/PDIF audio patch in, at $197. Also employs a quiet fan. The way I figure it, today's top of the line card is tomorrow's mediocre card, so no need to spend too much to get the best GPU. 512 MB is probably necessary though, to get the 1920x1080 HDTV resolution I want.
RAM: Kingston 1G HyperX (DDR2) x 2
HD : Seagate 320 GB
Possibly going to add in more Raid 1 (mirroring) HD in the future for pictures, movies etc
DVD: Pioneer DVR-213LS
ATX case: Clear arylic ATX
Found this beautiful transparent ATX case in one of the back lanes of Sim Lim. At $105, its worth it!
Power supply: Enermax 625W 82+ modular
I decided not to scrimp here, and get one of the better and quieter power supply around. I want to make my rig as silent as possible
Total costs: $1380
As you probably realise by now, my design criteria for the gaming rig is
1. <$1500
2. silent pc
3. decent upgradability for the graphics card
A picture of the assembly progress :

Motherboard: Gigabyte GA-EP45-DS3R
Intel P45 chipset has the 16 lanes of PCI-e 2.0, which is good for future graphics card upgrade. It's the latest mainstream chipset. Can support 1066 MHz DDR2 RAM, and up to 1600 MT/s FSB. Going to try overclocking on this in the future.
CPU: Intel E8400
45nm, 65W TDP, 3 GHz clock, FSB clock 333 MHz, FSB 1333 MT/s, most importantly 6 MB L2 cache, so you dont need a super duper fast dual-channel RAM.
Graphics: Asus EN9600GT, 512 MB
A standard nVidia 9600 chipset with core speed of 650 MHz. All the frills one need, ie, HDMI, DVI, VGA, S/PDIF audio patch in, at $197. Also employs a quiet fan. The way I figure it, today's top of the line card is tomorrow's mediocre card, so no need to spend too much to get the best GPU. 512 MB is probably necessary though, to get the 1920x1080 HDTV resolution I want.
RAM: Kingston 1G HyperX (DDR2) x 2
HD : Seagate 320 GB
Possibly going to add in more Raid 1 (mirroring) HD in the future for pictures, movies etc
DVD: Pioneer DVR-213LS
ATX case: Clear arylic ATX
Found this beautiful transparent ATX case in one of the back lanes of Sim Lim. At $105, its worth it!
Power supply: Enermax 625W 82+ modular
I decided not to scrimp here, and get one of the better and quieter power supply around. I want to make my rig as silent as possible
Total costs: $1380
As you probably realise by now, my design criteria for the gaming rig is
1. <$1500
2. silent pc
3. decent upgradability for the graphics card
A picture of the assembly progress :

Subscribe to:
Posts (Atom)