Saturday, July 26, 2008

Internet Radio Device

I decided to use the pico-ITX computer mainly as an internet radio device. Ok, so this would be an under-utilization of the 1 GHz CPU, 512 MB, Win XP appliance, but I can't think of any other more interesting applications that I would need at the moment. Of course I can use it to watch streaming video, or play my mp3 collections, but internet radio (SHOUTCAST) would be its main purpose.

I googled and installed the following software
- Winamp : mp3, internet radio player
- CLamp : command line control application to Winamp's API
- AutoHotkey : a key mapping tool with surprisingly powerful scripting capabilties.

I also got myself a nice little numeric keyboard. With a simple script, I am now able to select radio stations, control volume, and shutdown the device with a single keypress. I have also configured XP so that it will autoplay the first internet radio station upon boot up. No user input required. On the power switch, wait 30s, you got the music. The audio-out goes straight to my hi-fi system auxilary input, so the sound is great.


The device doesn't need a monitor to boot up, but I linked the VGA out to my HDTV. I usually off the HDTV when I turned on the device, but if I wanted to find out the name of a particularly good song, I can check it out on screen.

Small-Form Factor PC and Win CE

When I got the VIA Artigo, it comes bundled with full (but non-commerical) versions of Windows CE 6.0 and Visual Studio 2005. I guess its part of Microsoft's marketing to get more people hooked on their embedded OS.

I tried playing with Windows CE 6.0 R2. Its a bit irritating at first because I had to install a couple of service packs before Win CE 6.0 R2 can be installed. But once I got Windows CE running, I am impressed (I am normally not a fan of Microsoft). Win CE is good for quickly building embedded applications. With the Platform Builder in Visual Studio, one can click and add components such as web servers, drivers, OS applications from a fairly comprehensive library into an image. This image (a bit like vmlinuz) is compiled and downloaded into the target embedded device. Downloading and debugging is done via ethernet, so its very convenient (once you managed to install and run eboot.bin onto the target so that it can initiate the ethernet connection)

Provided
that a Win CE board support package (BSP) is available from the embedded platform vendor, embedded linux development should eat the dust compared to Windows CE where it comes to time-to-market. A BSP contains the customised driver code needed to interface with the platform devices and peripherals.


Unfortunately, fast doesnt mean no work. Tinkering is still needed to make CE work on the Artigo. Artigo just refuses to recognize my USB thumbdrives. Since I was not really keen to spend many hours doing embedded development/debugging at this particular moment, I decided to just use good old XP instead. Actually I was deciding between XP and Linux, but because of the application that was forming in my mind, I chose XP. Linux is stable and fast, but when it comes to multimedia and graphics, Windows is still better, in my opinion.

Friday, July 25, 2008

Small-Form PC

I was lucky enough to get my hands on a VIA Artigo computer recently. It is probably one of the smallest small-form PC ever. Sleek and small.


The VIA Artigo uses the pico-ITX motherboard, which is the smallest motherboard from VIA. The pico-ITX board is primarily designed for embedded applications that need more-than-the-usual horsepower. For example, industrial control, set-top boxes such as singtel's mio TV, car computers, ATMs, even thin clients.

VIA sells the Artigo computer as a hobbyist kit, without RAM or hard disk. My Artigo has the following.
- CPU : VIA C7 (This is a 1 GHz x86 CPU. It also apparently has built-in AES/SHA cryptographic cores!)
- Chipset: VIA VX700 (northbridge, southbridge, integrated graphics, HD audio all in one package). Supports SATA, IDE, USB, DDR2 RAM etc
- RAM: 512 MB
- 3.5" HD: 80 GB
- 4 USB ports
- 1 VGA port
- audio out and in ports

The VX700 chipset diagram


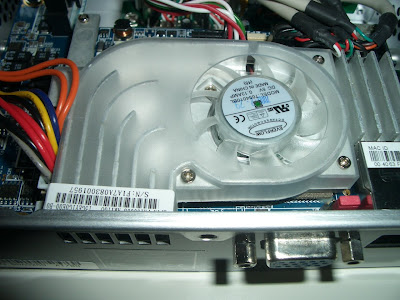
Lets see whats inside


The heat sink is for the C7 CPU and the VX700. I like the low profile heat disspation design.


Harddisk is mounted to the custom chasis mounting.


Removing the hard disk reveals the notebook RAM

Monday, July 14, 2008

Gaming Rig More Pics

I decided to upload some day pics of the rig as well.


I placed the RF transceiver for the mouse and keyboard inside the case, and held it down to the DVD bay with some tape.


The joints of the transparent case are made of acrylic too.

Gaming Rig Components Pics

EN9600GT graphics card with the 'gladiator' quiet fan


The red butterfly is the BTF90 fanless CPU cooler!


You can see the copper heat sink fins here. Note the height of the cooler. There are also four heat pipes. A casing fan and the power supply fan are just next to the cooler to ensure a good air flow.


And this must be the northbridge heat sink ....


And the smaller southbridge heat sink.


Back IO port panel


And the 625W Enermax Mod82+ power supply. Its pretty quiet and the modular connectors, while not essential, make the case a lot tidier. The casing fans turn out to be the main noise generator here.

Gaming Rig Pics

These flashy LED fans give the rig a warm fuzzy glow ....


The first game I tested the rig on is Command & Conquer : Tiberium Wars. Playing at 1920x1080 widescreen ... real nice!


Tuesday, July 1, 2008

9600GT overclocking

Okay the next step is to overclock the GPU (Graphics Processing Unit). An overclocked GPU speeds up gameplay a lot than an overclocked CPU. It turns out to be pretty easy and safe to overclock the GPU. One merely adjusts the clock frequencies (core, shader, memory) via software and there is no risk of over-voltage damage. The only risk is that higher frequencies may result in too high a temperature and cause thermal damage. From the nVidia forums, people claimed that the 9600GT can work safely even up to 80 'C, and the typical load is around 50 - 60 'C.

I tuned the settings using nVidia's control panel, and tested the stability of different values using 3DMark06. I tried Rivatuner for tuning, but it doesn't yet officially support the latest nVidia driver, and anyway the vendor's own software is good enough.

The default frequencies are ...
core : 650 MHz
shader : 1625 MHz
memory (DDR) : 900 MHz
3DMark06 score : 10702

I found out that the shader frequency in the 9600GT is apparently linked to the core frequency by a ratio of 2.5, ie, an increase of 10 MHz in core = 25 MHz in shader, for the 9600GT to be stable.

After a few tries, the best stable frequencies I can get is
core : 775 MHz
shader : 1938 MHz
memory : 975 MHz
3Dmark06 score : 12068

Running C&C3 for some time (at the best graphics settings), I get a highest GPU temperature of around 52 'C, so the temperature is well within limits. I had tweaked the core clock to increase by 19%, and the benchmark reports an increase in performance of around 13%. Excellent! Comparing my 3Dmark06 score with so-called VirtualMark scores (simulated for other configurations that are not overclocked),

mine | 8800GT | other 9600GT | 9800GX2
12068 | 11600 | 10500 | 13600

Now the 9600GT GPU is a mainstream card. nVidia named their cards as x400, x600 or x800, where x400 is for low-end, x600 for mainstream games and x800 is for the best gaming performance. The nVidia 9000 series is a newer architecture compared to the previous the 8000 series generation. Now the 9600GT is supposed to perform a bit worst than the 8800GT normally, but after overclocking its on par! And now my OCed GPU performs not too badly against the 9800GX2 (2 GPU cores), which is the best currently, and cost like 4 times as much. He he ....